ChatOps: Pingdom Alerts Pushed into HipChat with AWS Lambda and API Gateway
25 Nov 2015
You probably searched “pingdom alerts in hipchat” or “pingdom hipchat integration” and were unhappy to find that there’s no direct method to integrate the two services. I was too - but it gave me the chance to use the AWS API Gateway and AWS Lambda to connect the two services. I assume you’re relatively familiar with the functionality that API Gateway and Lambda provide as well as getting-started experience with Node.js.
Pingdom Webhooks
The documentation on the Pingdom site describes how to find the webhook payload structure, so I followed their advice and observed the up & down webhook events. I don’t use it this demo, but each of the webhooks a X-Request-Id header was sent with a value like 6645779c-18a9-473d-808e-2b74450c7347. You may find this useful for tracing purposes.
Down
As you can see, the assign webhook is a GET request with the message payload as an URI encoded json string. It would be nice if this was a POST, but ¯\_(ツ)_/¯.
GET /webhook-endpoint?message=%7B%22check%22%3A%20%221834565%22%2C%20%22checkname%22%3A%20%22just%20a%20test%22%2C%20%22host%22%3A%20%22www.example.com%22%2C%20%22action%22%3A%20%22assign%22%2C%20%22incidentid%22%3A%208765%2C%20%22description%22%3A%20%22down%22%7D
The decoded querystring looks like:
message = {
  "check": "1834565",
  "checkname": "just a test",
  "host": "www.example.com",
  "action": "assign",
  "incidentid": 8765,
  "description": "down"
}
Up
Aka notify_of_close or resolved:
GET /webhook-endpoint?message=%7B%22check%22%3A%20%221834565%22%2C%20%22checkname%22%3A%20%22just%20a%20test%22%2C%20%22host%22%3A%20%22www.example.com%22%2C%20%22action%22%3A%20%22notify_of_close%22%2C%20%22incidentid%22%3A%208765%2C%20%22description%22%3A%20%22up%22%7D
message = {
  "check": "1834565",
  "checkname": "just a test",
  "host": "www.example.com",
  "action": "notify_of_close",
  "incidentid": 8765,
  "description": "up"
}
Testing with curl
For testing purposes you may want a quick curl statement to act as Pingdom (so you don’t have to deliberately take a monitored endpoint down):
curl -H 'X-Request-Id: 6645779c-18a9-473d-808e-2b74450c7347' https://1x1x1x1x1x.execute-api.us-east-1.amazonaws.com/prod/pingdom-webhook?message=%7B%22check%22%3A%20%221834565%22%2C%20%22checkname%22%3A%20%22just%20a%20test%22%2C%20%22host%22%3A%20%22www.example.com%22%2C%20%22action%22%3A%20%22assign%22%2C%20%22incidentid%22%3A%208765%2C%20%22description%22%3A%20%22down%22%7D
Now that we understand Pingdom’s webhook a bit better, let’s have a look at the AWS parts.
AWS Lambda
Before we configure the API Gateway, let’s have a look at the Lambda function. We do this first because you’ll need to select the Lambda when you create the API Gateway resource. I chose to use Node.js, but the code is straightforward and should be able to be ported to python easily.
When creating a Lambda function you’ll be prompted to select a blueprint. Any will do, but microservice-http-endpoint will most closely mirror the functionality of our Lambda. With a blueprint selected, you’ll need to configure the name, runtime, handler (entry point), IAM role, memory, and timeout for the Lambda. You will likely need to create a basic IAM role to allow your Lambda (the AWS console will help you do this), and you’ll want to decrease the memory requirement to 128MB.
The entry point for the Lambda in this example is index.pingdomToHipchat, and per the Lambda spec the function takes the event and context objects. The full repo is on GitHub, and I’ve included the index.js below:
1
2
3
4
5
6
7
8
9
10
11
12
13
14
15
16
17
18
19
20
21
22
23
24
25
26
27
28
29
30
31
32
33
34
35
36
37
38
39
40
41
42
43
44
45
46
47
48
49
50
51
52
53
54
55
56
'use strict';

var http = require('https');
var config = require('./config.js');

exports.pingdomToHipchat = function(event, context) {
  // the contents of event is dependent on the configuration of API Gateway
  // console.log('the message is', event.message);

  // there some things that the decodeURI method doesn't clean up for us
  var msg = JSON.parse(decodeURI(event.message).replace(/\+/g, ' ').replace(/%3A/g, ':').replace(/%2C/g, ','));
  console.log('the message json is:\n', msg);

  var hc_msg = {
    color: msg.description === 'down' ? 'red' : 'green',
    message: msg.checkname + ' is ' + msg.description + ' (' + msg.host + ')',
    notify: false,
    message_format: 'text',
  };

  console.log('hipchat message:\n', hc_msg);

  var http_opts = {
    host: 'api.hipchat.com',
    port: 443,
    method: 'POST',
    path: '/v2/room/' + config.hipchat.room + '/notification?auth_token=' + config.hipchat.token,
    headers: {
      'Content-Type': 'application/json',
    }
  };

  var req = http.request(http_opts, function(res) {
    res.setEncoding('utf8');
    res.on('data', function (chunk) {
      console.log('BODY:', chunk);
    });
    res.on('end', function () {
      if (res.statusCode === 204) {
        console.log('success - message delivered to hipchat');
        context.succeed('message delivered to hipchat');
      } else {
        console.log('failed with', res.statusCode);
        context.fail('hipchat API returned an error');
      }
    });
  });

  req.on('error', function(e) {
    console.log('problem with request:', e.message);
    context.fail('failed to deliver message to hipchat');
  });

  req.write(JSON.stringify(hc_msg));
  req.end();
};
On line 11 event.message is decoded and then cleaned further to compensate for the remaining encoding weirdness. Once I figured out how to translate the querystring params in API Gateway, iterating on this was the last bit of magic to get a json representation of the Pingdom alert in the Lambda function. The rest of the code creates the HipChat notification API request & payload, and then sends the request.
The console.log statements are sent to CloudWatch - which can help you audit or debug during development. The built-in Lambda test functionality is also captures this output, and is the quickest way to ensure that changes to the Lambda function as expected. This is the test event for the Lambda above:
{
  "requestId": "6645779c-18a9-473d-808e-2b74450c7347",
  "message": "%7B%22check%22%3A%20%221834565%22%2C%20%22checkname%22%3A%20%22just%20a%20test%22%2C%20%22host%22%3A%20%22www.example.com%22%2C%20%22action%22%3A%20%22notify_of_close%22%2C%20%22incidentid%22%3A%208765%2C%20%22description%22%3A%20%22up%22%7D"
}
Lastly, if you want to be able to copy/paste this code into the AWS Lambda console for testing you’ll need to remove the config.js require on line 4 and replace the two values on line 27 with your HipChat token and room id. More on finding these values for your setup below.
Now that we have the Lambda squared away, let’s see how it gets wired up with the API Gateway.
AWS API Gateway
The API Gateway takes the Pingdom GET request and populates the event object passed to the Lambda. This step would be much easier if the Pingdom webhook used POST instead of GET, but you’ll learn something interesting about the API Gateway as a result.
Inside the API Gateway console create a new API, create a resource, and create a GET method. When creating the method, you’ll need to select “Lambda Function” as the integration type the region the Lambda function is deployed into, and the Lambda name (which will auto-complete).
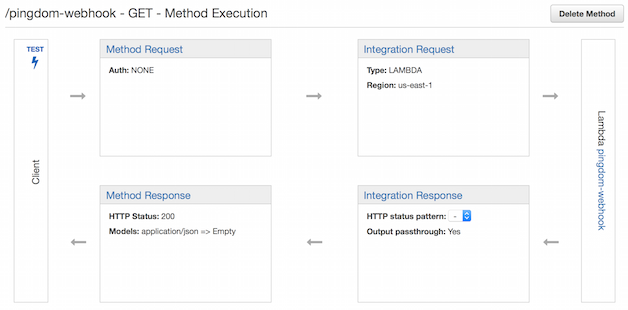
At this point you should see something like this:
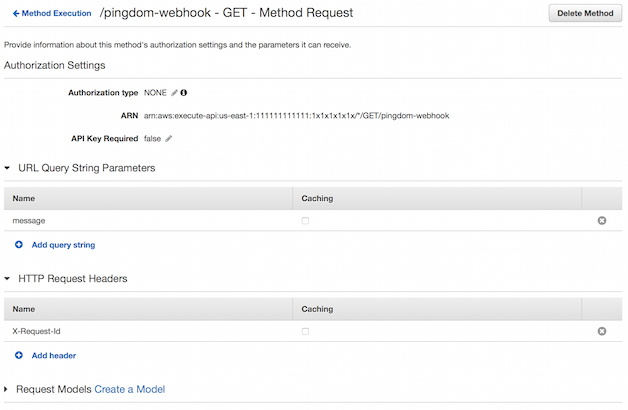
There’s a couple things we need to do to translate the incoming Pingdom GET into the event that the Lambda expects. The first is to define the method request. We need to specify the X-Request-Id header and message query string as shown below:
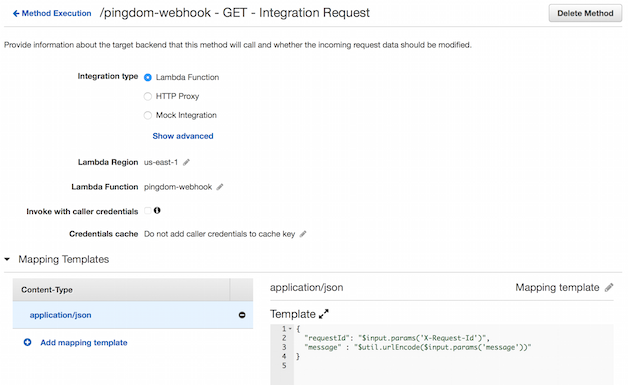
The magic happens in the integration request configuration. Select “Lambda Function” for the integration type, select your Lambda function name, and add an application/json content-type Mapping Template. The previous step made X-Request-Id and message available to be mapped into the event as follows:
Header parameters and query string parameters are both fetched via the "$input.params('key')" function. Due to the encoding of the Pingdom webhook, we need to urlEncode the message value to avoid a parse exception.
{
  "requestId": "$input.params('X-Request-Id')",
  "message" : "$util.urlEncode($input.params('message'))"
}
Once all this is configured, you’ll need to “Deploy API”. Stages are used as environments, so you can test API changes as they roll from development to production. If you make changes you’ll need to redeploy the API. Assuming your production environment is prod, you’ll receive a url like https://1x1x1x1x1x.execute-api.us-east-1.amazonaws.com/prod/pingdom-webhook.
Prepping HipChat
HipChat’s v2 API requires you to create an integration to push notifications to rooms. This is done via the HipChat admin console and creates an authentication token for the room id specified.
If you clone the repo, you’ll want to cp config.js.sample config.js and add your token and room id to the config:
module.exports = {
  hipchat: {
    token: 'xxxxxxxxxxxxxxxxxxxxxxxxxxxxxxxxxxxxxxxx',
    room: '1111111'
  }
};
You can find more detail about how to package multiple files for upload to a Lambda function in the README.
Putting it all together
If all goes well, you should be able to issue curl command above and see a notification appear in the configured HipChat room. Use down and up in the description to see red and green highlighted messages:
In Pingdom you’ll need to go into Alerting > Alerting Endpoints and add a webhook contact method to an Alerting Endpoint used by an Alert Policy that is used by the check you’d like to see in HipChat. You likely already have an Alert Policy used for your check, so adding an additional endpoint for that policy should be straightforward.
I hope this works for you, and please let me know if it doesn’t! Big thanks to @ripienaar for his post on translating webhooks that got me thinking about this in the first place.


